


 I introduced development environment for microchip PIC controllers on Linux in different article.
Now would like to write something about AVR development tools (on Linux) as well.
A lot of hobbyists are using excellent open-source AVR development software like gcc cross-compiler and avrdude downloader.
They are all CUI-based software tools and it may be hard for beginners like me to begin with, while GUI-based development is so easy.
I introduced development environment for microchip PIC controllers on Linux in different article.
Now would like to write something about AVR development tools (on Linux) as well.
A lot of hobbyists are using excellent open-source AVR development software like gcc cross-compiler and avrdude downloader.
They are all CUI-based software tools and it may be hard for beginners like me to begin with, while GUI-based development is so easy.
In this article, I would like to explore installation of GUI-based avr-gcc on Eclipse platform.
About software tools
Following software tools are used for development suite for AVR on Linux (Fedora 12).
- AVR GCC
- AVRDude
- Eclipse
- AVR Eclipse Plugin
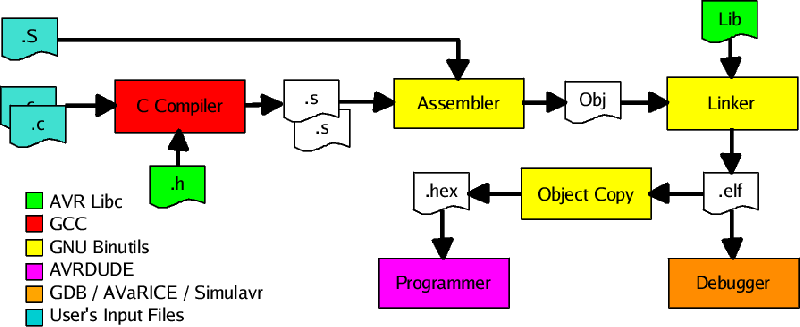
AVR GCC is a cross-compiler for Atmel AVR microcontrollers based on GNU C Compiler. It is called "C compiler", but can also handle direct compilation from assembler source files. Inside of it, GNU Assembler is invoked after the C Compiler converts C source files into assembly language files, and then the linker gathers those object files into a downloadable/executable binary file. The following picture shows simplified process and relationship of each software and input/output files.
For more information on AVR GCC toolchain, you can check
AVR GCC/AVR GCC Tool Collection (AVR Freaks)
About details on AVR LIBC,
AVR LIBC User's Manual (http://www.nongnu.org/avr-libc/user-manual/)
will be helpful.
AVRDude is an open-source software to program Atmel AVR microcontrollers. The original AVRDude is a CUI-based tool although various GUI versions have been developed. In this article AVRDude is used from Eclipse to download executable binary files to AVR MCU.
You can access AVRDude homepage at here: http://savannah.nongnu.org/projects/avrdude/
You can access Eclipse homepage at http://www.eclipse.org/
You can check AVR Eclipse Plugin homepage at "The AVR Eclipse Plugin"
Install AVR-GCC and AVRDude
First, install basic AVR compiler-related packages and AVRDude from [Add software] from Linux (Fedora 12) system menu. Following packages have been installed.
- avr-binutils-2.20-2.fc12
- avr-gcc-4.4.2-2.fc12
- avr-gdb-6.6-11.fc12
- avr-libc-1.6.7-2.fc12
- avra-1.2.3-4.fc12
- avrdude-5.10-1.fc12
Actually, that's minimum required software tools for development. You just need to write a short script or makefile before you can start AVR software development on command line. (You may want to add other useful programming/debugging packages, but we don't use them this time.)
AVR GCC is ready?
Let's check if you can use avr-gcc with no problem. I write up a small, simple C source file, useless but for testing. (It will continuously put out 8-bit data to port B.) Here, you can compile it into a HEX file by typing short commands like the following example. The example shows that avr-gcc compiles the source, links into an ELF binary, avr-objcopy converts it into HEX, and finally avr-objdump puts out disassembly code for confirmation. (Test of AVRDude is written later in the article with the preparation of target hardware.)
C source file to check installation of avr-gcc (avrgcctest.c)$ avr-gcc -O2 -Os -mmcu=attiny2313 -o avrgcctest.elf avrgcctest.c $ avr-objcopy -R .eeprom -O ihex avrgcctest.elf avrgcctest.hex $ cat avrgcctest.hex :1000000012C02AC029C028C027C026C025C024C0CD :1000100023C022C021C020C01FC01EC01DC01CC0E4 :100020001BC01AC019C011241FBECFEDCDBF10E0F8 :10003000A0E6B0E0EAE6F0E002C005900D92A0363E :10004000B107D9F710E0A0E6B0E001C01D92A036DC :10005000B107E1F702D007C0D3CF8FEF87BB80E0B5 :0A0060008F5F88BBFDCFF894FFCF3F :00000001FF $ avr-objdump -d avrgcctest.elf avrgcctest.elf: file format elf32-avr Disassembly of section .text: 00000000 <__vectors>: 0: 12 c0 rjmp .+36 ; 0x26 <__ctors_end> 2: 2a c0 rjmp .+84 ; 0x58 <__bad_interrupt> 4: 29 c0 rjmp .+82 ; 0x58 <__bad_interrupt> 6: 28 c0 rjmp .+80 ; 0x58 <__bad_interrupt> ----------------------------------------------------------- (... continues until the end)
Usually in CUI-based development everyone maintains projects by using "make" and "makefile". However, it is sometimes bothersome for hasty beginners (for instance, the author of this article) who want quick start of AVR development. Don't worry. Eclipse helps you.
Install Eclipse platform
I'm using Fedora 12, in which all I did was installing the Eclipse package from repository and Eclipse basic features were ready for Java and C/C++ development. If you are using other distribution, some more steps might be necessary, but I believe that installation of Eclipse and CDT would not be so difficult (I didn't confirm, though). On installation of Eclipse, I didn't switch OpenJDK to Sun Java because there seemed to be no problem at all for my purpose.
Please allow me to skip details about Eclipse and CDT installation as there are plenty of good reference, how-to's and examples.
The version of the Eclipse I installed from Fedora repository was
- eclipse-platform-1:3.5.1-22.fc12 (Galileo / 3.5.1)
After installation is done, start Eclipse to designate your workspace. No need to change its location from default "workspace" although I did change it to "eclipse_workspace" because I already had a directory with the same name.
Now let's check if Eclipse CDT is ready. When you install a new development tool, it may be a ritual step to build "Hello, world" project. That act seems waste of time, but it is important to see if Eclipse and GCC are working correctly. You can quickly create and build "Hello, world" project only with few steps.
- Start Eclipse, and from its menu select [Window] → [Open perspective] → [Other...] → [C/C++]
- [File] → [New] → [C Project] to launch the project wizard.
- [Next] → [Finish] and done
Fill in/choose settings like following;
| [Project Name]: | Hello |
|---|---|
| [Project type]: | [Executable] → [Hello World ANSI C Project] |
| [Toolchains]: Linux GCC | Linux GCC |
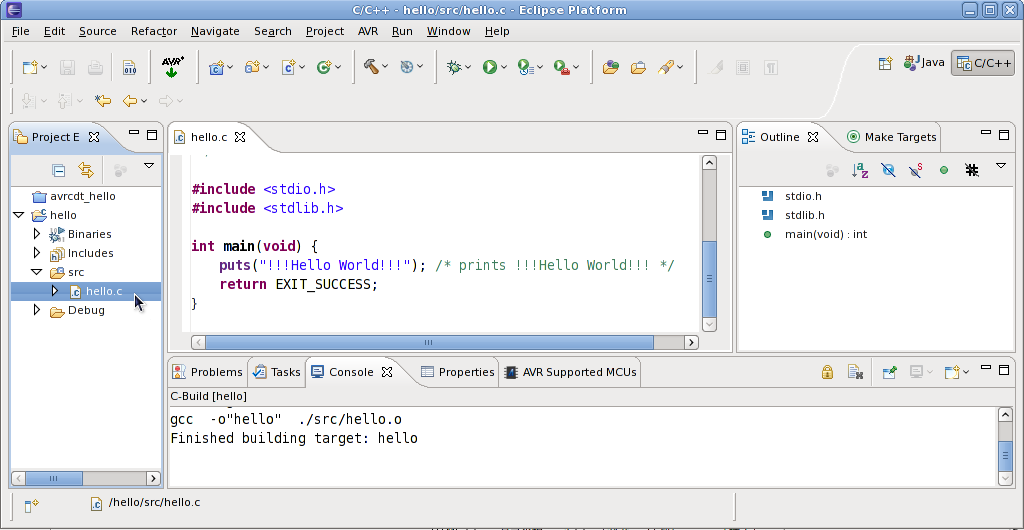
Eclipse C/C++ "Hello world" (click to enlarge)
That is the example of Eclipse and GCC to build projects for PC software. Next, let's install "AVR Eclipse plugin". It will allow you to build projects for Atmel AVR by adding avr-gcc toolchain to Eclipse.
Install AVR Eclipse plugin
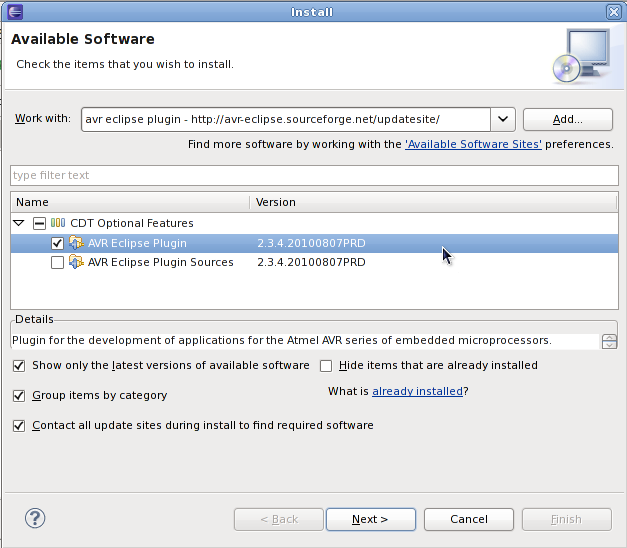
Following instructions at homepage of AVR Eclipse plugin, install from Eclipse's update feature.
The example shows the steps on Eclipse 3.5 (Galileo), and note that other versions may have different menu or dialog labels.
- Feature update
- Add download site
- Select AVR Eclipse Plugin
- Confirmation
From menu of Eclipse, [Help] → [Install New Software] to open [Install] dialog.
By click of [Add...] button beside [Work with] box, and add new update site for "AVR Eclipse plugin" as a download source.
(Note: The homepage didn't write about installation steps on Galileo (Eclipse 3.5 series).
I tried the URL for 3.4 or 3.3 (http://avr-eclipse.sourceforge.net/updatesite/), and it seemed OK as Galileo recognized the correct location.)

Eclipse feature update
Select [AVR Eclipse Plugin] below [CDT Optional Features], and start installation by following instruction of dialogs. When finished, restart Eclipse.
Install Eclipse AVR Plugin
After restart of Eclipse, switch perspectives to [C/C++], then you can see a new menu item and a button for AVR.
Eclipse AVR Plugin: Button and Menu
That's the end of all installation steps (Installed version was "2.3.4.20100807PRD"). Now, we prepare a target hardware and create new project for it.
Prepare the target
Programmer
My AVR programmer in the article is "Olimex AVR-ISP500".
Reference:
Olimex AVR-ISP500
(http://www.olimex.com/dev/avr-isp500.html)

Olimex AVR-ISP500

AVR-ISP500: ICSP6 connector
Target hardware
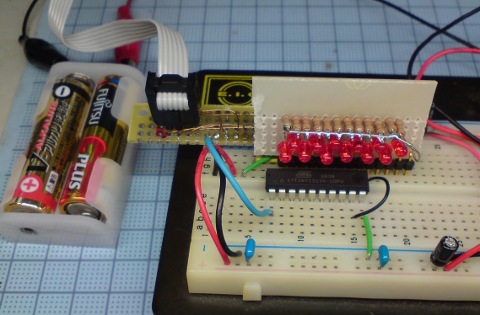
I prepared this small target for the article by using ATtiny2313 and LED's on bread board.
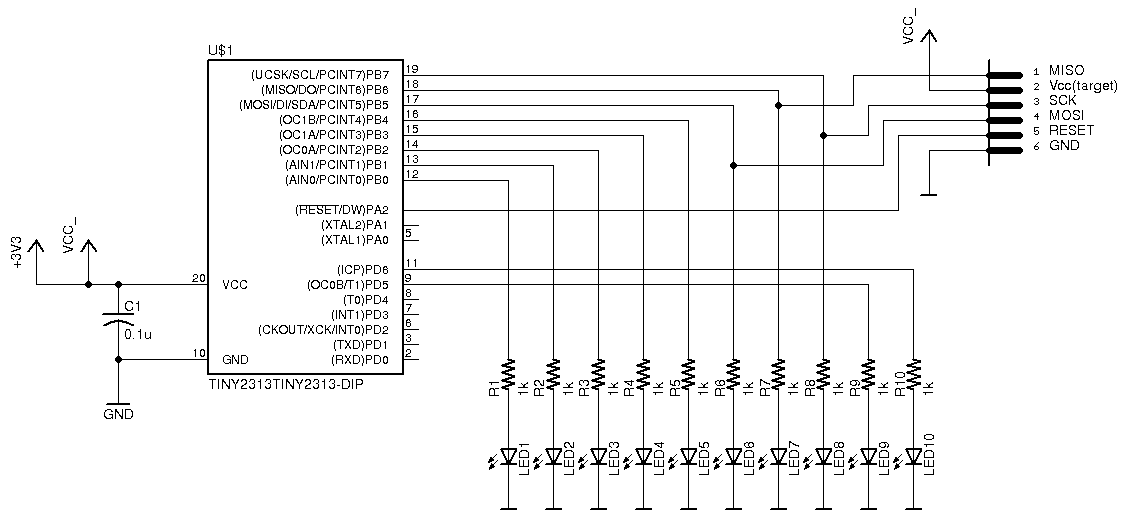
Target schematic
For details about ATtiny2313, please see → Atmel ATtiny2313 page (http://www.atmel.com/dyn/products/product_card.asp?part_id=3229).
Target hardware
I made a simple connection board to connect ISP signals to bread boards.
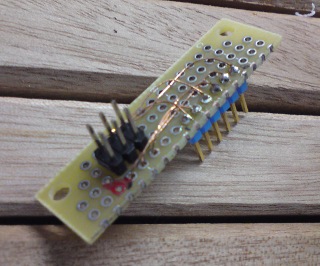
ISP connection board
Testing AVRDude
AVR Eclipse plugin communicates with target hardware with assistance of AVRDude. Before using Eclipse, let's confirm if AVRDude is able to talk with your target hardware.
The following example shows the result of my test with Olimex AVR-ISP500. In the example, I confirmed valid connection to the target and then programming the hex file which is compiled during the test of avr-gcc. You may need to change some AVRDude options to test with your own target and programmer.
| Programmer (-c option) | "stk500v2" (STK500 version2 compatible) |
|---|---|
| Port (-P option) | "/dev/ttyACM0" (check availability by "ls /dev/ttyACM*") |
| Target device (-p option) | "t2313" (ATtiny2313) |
$ ls -l /dev/ttyACM*
crw-rw----. 1 root dialout 166, 0 2010-09-03 08:58 /dev/ttyACM0

$ avrdude -c stk500v2 -P /dev/ttyACM0 -p t2313

avrdude: AVR device initialized and ready to accept instructions

Reading | ################################################## | 100% 0.03s

avrdude: Device signature = 0x1e910a

avrdude: safemode: Fuses OK

avrdude done.  Thank you.

$ avr-gcc -O2 -Os -mmcu=attiny2313 -o avrgcctest.elf avrgcctest.c
$ avr-objcopy -R .eeprom -O ihex avrgcctest.elf avrgcctest.hex
$ avrdude -p t2313 -c stk500v2 -P /dev/ttyACM0 -U flash:w:avrgcctest.hex:a

avrdude: AVR device initialized and ready to accept instructions

Reading | ################################################## | 100% 0.03s

avrdude: Device signature = 0x1e910a
avrdude: NOTE: FLASH memory has been specified, an erase cycle will be performed
         To disable this feature, specify the -D option.
avrdude: erasing chip
avrdude: reading input file "avrgcctest.hex"
avrdude: input file avrgcctest.hex auto detected as Intel Hex
avrdude: writing flash (106 bytes):

Writing | ################################################## | 100% 0.37s

avrdude: 106 bytes of flash written
avrdude: verifying flash memory against avrgcctest.hex:
avrdude: load data flash data from input file avrgcctest.hex:
avrdude: input file avrgcctest.hex auto detected as Intel Hex
avrdude: input file avrgcctest.hex contains 106 bytes
avrdude: reading on-chip flash data:

Reading | ################################################## | 100% 0.31s

avrdude: verifying ...
avrdude: 106 bytes of flash verified

avrdude: safemode: Fuses OK

avrdude done.  Thank you.

$
If you have no idea what options are good for your target, AVRDude can show available choice to you. AVRDude will put out list of supported programmer or device names when invalid names are given. You can look for a good option string for your settings by trying with improbable names (for example, "avrdude -p foobar", "avrdude -p stk500v2 -c foobar").
Note:
AVRDude communicates with AVR-ISP500 programmer via USB CDC port (/dev/ttyACM*).
For programmers to communicate through a USB serial port, the user needs to obtain read/write access permission to the device file.
If you don't have proper access rights, you need to add your account to the appropriate group who owns access permission to the device file (In Fedora 12, /dev/ttyACM* files are available to the group of "dialout").
Create AVR GCC project
Every necessary tools are ready now. Let's start making new AVR project on Eclipse.
Start New project (AVR-GCC toolchain)
- Create new C Project
- Select AVR GCC toolchain
- Setting target device
From Eclipse(C/C++ perspective) menu, [File] → [New] → [C Project] to launch the project wizard.
Among the choice of [Project type], select [AVR Cross Target Application] → [Empty Project]. [Toolchains] will be [AVR-GCC Toolchain].

Creating AVR Eclipse C project (1)
Fill in [Project name], and click [Next]. You will see "Debug" and "Release" build configurations are made. After confirmation, click [Next].
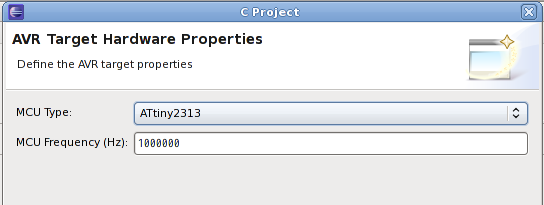
Next, select target device.
Select device name in [MCU Type] (in my case [ATtiny2313]), and fill in system clock frequency in [MCU Frequency(Hz)] (in my case [1000000], meaning the default setting of 1MHz; internal 8MHz RC oscillator divided by 8).
And then click [Finish] to create the project.
Creating AVR Eclipse C project (2)
Making source files
- Add source files
- Writing source code
From [Project Explorer] at the left of the screen, select the newly created project. And then from the menu, choose [File] → [New] → [Source File] to add your source file. Note that C-language source files should have trailing ".c" and assembly source files should have trailing ".S" in their file names.

Add AVR Eclipse C source file (1)
Open the new source file and start writing your own code. Eclipse will support convenient programming in C language. In my example, the software uses a timer0 interrupt to blink LED connected to the port.
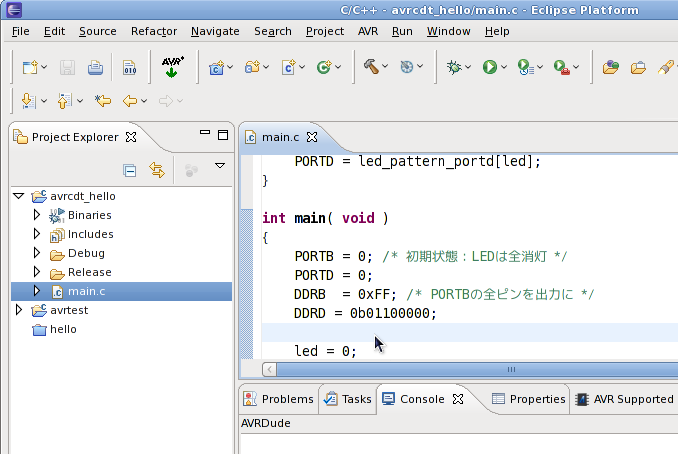
Add AVR Eclipse C source file (2)
Project settings
- AVR programmer settings
- Settings for AVR-ISP500
From Eclipse menu click [Project] → [Properties] to open the setting dialog, and then from [Resource] in the left choose [AVR] → [AVRDude] → [Programmer]. There will be no available programmer settings unless you make one. Click [New] button to make it for your own programmer.

AVR Eclipse : Setting AVRDude
Fill in following information to use Olimex AVR-ISP500 from Eclipse. The example should be changed for your environment. Please refer to the user manual to know what values should be set for your programmer.

Eclipse: AVRDude: Setting AVR-ISP500 programmer
| Configuration name: | Name of the settings. Should be easy to be identified. |
|---|---|
| Description: | Description of the settings. Should be concise to know what it is for. |
| Programmer Hardware (-c): | Choose programmer for this settings. |
| Override default port (-P): | Port name where the programmer is connected. ex: dev/ttyACM0 |
Once you created programmer settings, you can select it again in another new project. If you're using several different programmers, you need to create different settings for each.
Select configuration
- Select build configuration
- Change build settings
Choose "Debug" or "Release" configuration to build. From the menu, go to [Project] → [Build Configurations] → [Set Active], and choose [Debug] or [Release].
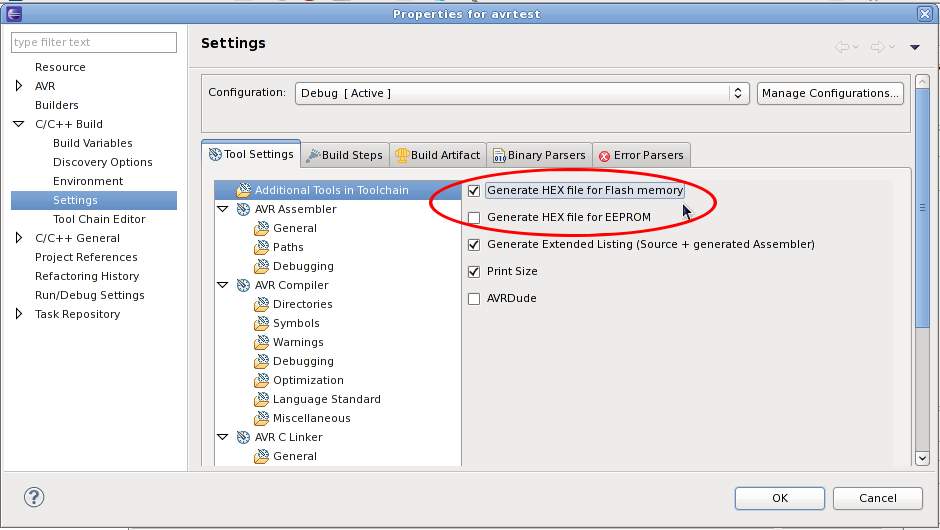
If you build without changing those configurations, you may encounter a problem. In "Debug" build, the last target is set to ELF binary and no downloadable HEX files are generated. In "Release" build, it generates two HEX files for both Flash memory and EEPROM while not every project needs EEPROM binary.
Choose configuration you want to change (here I explain the steps for Debug build, but almost same for Release build). From the menu, go to [Project] → [Properties] to open the setting dialog. From [Resource] in the left side, choose [C/C++ Build] → [Settings]. Make sure that [Configuration] is pointing "Debug [Active]" in the right top of the dialog, and then choose [Tool settings] tab and [Additional Tools in Toolchain] to change settings to generate each HEX files.
You can enable or disable HEX files as you need.
AVR Eclipse: Setting of HEX files
You can also change other compiler options there. From [Resource] in the dialog, choose [AVR Compiler] to see settings for avr-gcc. The example shows optimization settings for smaller code size (-O2 -Os). Other tools (like assembler, linker or avr-objcopy) are also available in the dialog for optimized settings.

AVR Eclipse: Settings for optimization
Build and Download
- Build
- Download and Run
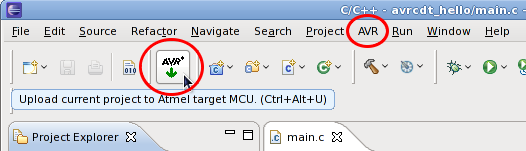
After you completed and saved the source code, you can start build the project from menu by choose [Project] → [Build Project].
After the build is done with no errors, you can program your target from menu by choose [AVR] → [Upload Project to Target Device] (or "AVR" button).
Congratulations! That's the end of the steps to start up your AVR project. After that, you will continue testing and debugging until your project is working successfully.
Appendix
About Fuses
To change fuse settings you need to specify direct hex values when using AVRDude CUI. It is very stressful process because it may cause malfunction of target devices, or at worst make it unusable. AVR Eclipse plugin helps you change fuses very easily.
- Enable Fuse writing feature
- Read in current Fuses
- Start modifying fuses
- Programming new fuse values.
- Disable fuse writing feature
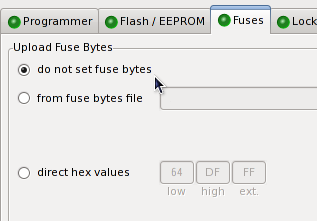
After setting up Eclipse so that you can program your target device, go to [Project] → [Properties] dialog, choose [AVR] → [AVRDude] and open [Fuses] tab. Turn on the option of [direct hex values] in [Upload Fuse Bytes].
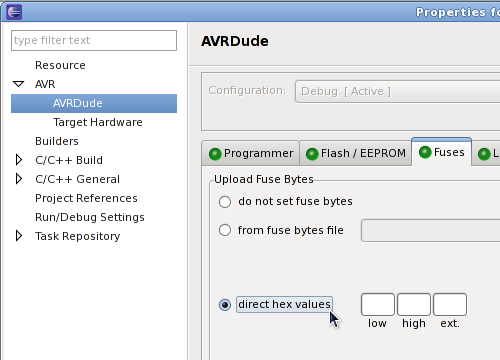
Click [Load from MCU] button to read in current fuse values already programmed in the device.

Launch the fuse editor by [Start Editor] button.

Fuse editor shows current values in the device. You can change each fuse values as you need. Be careful when editing, because a wrong fuse value may disable ISP programming or even break the target.

Here let's try new values for CKDIV8 fuse bit to disable system clock prescaler. Turn CKDIV8 "Yes" → "No", which will change the main system clock to 8MHz, currently 1MHz.

After completing new fuse values, close the fuse editor and then dialog by clicking [OK]. During next downloading to the target, the new fuse values are updated into the device, and it will start with new settings. In the example above, the main system clock increased from "1MHz = 8MHz / 8" to "8MHz = 8MHz / 1" and the speed of blinking LEDs.
After setting fuses, disable the feature by the same dialog.
Reference
- AVR Libc manual
- Avr Wiki: "Using Timer/Counter0" (Japanese)
How to write interrupt routines by avr-gcc (avr-libc)
→
Interrupts (http://www.nongnu.org/avr-libc/user-manual/group__avr__interrupts.html)
I studied how to use timer/counter0 interrupt by avr-gcc with this reference.
My example in the article has almost same code structure with their examples.
The content shows many helpful examples like other interrupt usage, assembly language usage etc.
→
Getting Started Notes - Timer0
Finally
After Arduino came to the market, more hobbyists are getting familiar with Atmel AVR microcontrollers. Arduino was my first experience to play with Atmel AVR and I realized that recent open-source development tools have very sophisticated user interface. In the article I introduced AVR Eclipse plugin, and I believe it provides us with as convenient AVR development environment as Arduino IDE.
When writing this article, I didn't have other programmer than AVR-ISP500 which had no debugging features. I'd like to explore Eclipse or GDB debugging features that I could not checked here.
I'm always happy when I could construct my development environment with open-source software. As conclusion, I'd like to say thank you with big gratitude to everyone who develops the excellent software and who supports it. Thank you!
Back to homepage